How to Set Up SPF & DKIM (Step-by-Step Guide)


If you're planning on using email to conduct business, it’s essential that you set up both SPF and DKIM records on your domain. In fact, it’s one of the most important bullet points on our cold email checklist.
The reason these records are so important is that they authenticate every email you send. This means when somebody receives an email, their email provider will know that you did, in fact, have permission to send the email from this domain.
If somebody sends from a domain and they do not have permission from that domain, this is called email spoofing, and you've probably heard of it.
So in this article, we'll be covering how to set up both SPF and DKIM records to ensure your domain is safe and to make sure your emails land in the primary inbox and not the spam folder. Let's dive into it!
What is an SPF record?
An SPF or sender policy framework is a method designed to detect bad actors trying to send emails on behalf of your domain. You can use SPF by adding an SPF record to your domain's DNS. SPF records look something like this:
- Record Type: TXT
- Host: @
- Value: v=spf1 include:_spf.google.com -all
We're not going to dive too deep into the technical reasoning behind SPF records, but if you'd like to learn more, you can dive deeper here.
What is DKIM?
DKIM or DomainKeys Identified Mail is an authentication method that informs the receiver of an email that the sender authorized and approved the sending of that email. Similar to SPF records, DKIM also protects your domain from bad actors trying to send emails on your behalf. DKIM records look something like this:
- Record Type: TXT
- Host: google._domainkey
- Value: v=DKIM1; k=rsa; p=MIGfMA0GCSq...
Again, we're not going to go in-depth on the technical reasoning behind DKIM, but if you'd like, you can learn more here.
Why are SPF and DKIM important?
One of the main reasons why SPF and DKIM are important is because they protect you from email spoofing. Email spoofing is when somebody sends an email through your domain without your permission. By setting up SPF and DKIM, you will block bad actors from spoofing your domain.
If you are a tech company and you have online customers, SPF and DKIM are even more important because bad actors spoofing your domain can gain access to users by sending fake emails from your domain.
Another important reason why SPF and DKIM are important is that they reduce the chance that your emails land in spam. If you're using email to conduct business or even to send cold emails, it's essential that you have SPF and DKIM records set up correctly on your domain's DNS. Without them, there's a high chance you'll land in the spam folder, and there's nothing worse than emailing a customer or potential customer and them not seeing your email.
To quickly recap, here are the most important reasons:
- Stops bad actors from spoofing your domain.
- Increases your chance of landing in the primary inbox.
- Increases the results of cold email campaigns.
- Increases the open rates of marketing emails.
How to Set Up SPF on Your Domain
Here's how to set up an SPF record on your domain in a few short steps.
Step #1) List out all the services you use to send emails.
An SPF record gives some services permission to send on behalf of your domain while blocking all others from sending on behalf of your domain. This means it's important to ensure that your SPF record approves all the services that you are currently using to send emails because you need to include all of these services in your SPF record.
So compile a list of the services you're currently using; it might look something like this:
- MailChimp
- SendGrid
- MailGun
Step #2) Find what domain or IP address is used by each service.
Your domain is only allowed to have one SPF record at a time, so we'll need to compile a list of the recommended SPF records from all the services before we can build your own SPF record. Let's find each recommended SPF record from all of the services in the example above.
- Google: v=spf1 include:_spf.google.com ~all
- MailChimp: v=spf1 include:spf.mandrillapp.com ?all
- SendGrid: v=spf1 include:sendgrid.net -all
- MailGun: v=spf1 include:mailgun.org ~all
Step #3) Build your SPF record.
Now that we have all the services we use to send emails listed out, let's build our SPF record. As I mentioned earlier, we'll need to combine all of the services' SPF records because we're only allowed one SPF record on our domain at a time. NOTE: A subdomain can have its own SPF record.
Every SPF record will start with "v=spf1" and ends with a variation of "-all". The information in between will need to be included in our SPF record.
So, when we combine Google, MailChimp, SendGrid, and MailGun, the SPF record will look like this:
v=spf1 include:_spf.google.com include:spf.mandrillapp.com include:sendgrid.net include:mailgun.org -all
We can even customize the "-all" at the end depending on how we want to handle emails that don’t pass authentication:
- -all - Reject if it does not pass (Recommended)
- ~all - Accept if it does not pass but mark suspicious (Usually send these emails to spam)
- ?all - Accept all (Not recommended)
Step #4) Add your SPF record to your domain's DNS.
Now that we've built our SPF record, let's add it to your domain's DNS. If you don't have access to your domain's DNS or don't know what a DNS is, you may have to ask your web admin to help you out.
So we'll open up our DNS and create a new record. Following our example above, this is what a record will look like:
- Record Type: TXT
- Host: @
- Value: v=spf1 include:_spf.google.com include:spf.mandrillapp.com include:sendgrid.net include:mailgun.org -all
Once you've added your SPF record to your domain's DNS, you are all done!
How to Set Up DKIM on Your Domain
Next, let's walk you through how to set up DKIM on your domain's DNS. The steps to set up DKIM change depending on your email service provider. We'll be generating our DKIM token using Google Workspace. However, if you're using Microsoft as your email service provider, you can learn how to generate a DKIM token through Microsoft here.
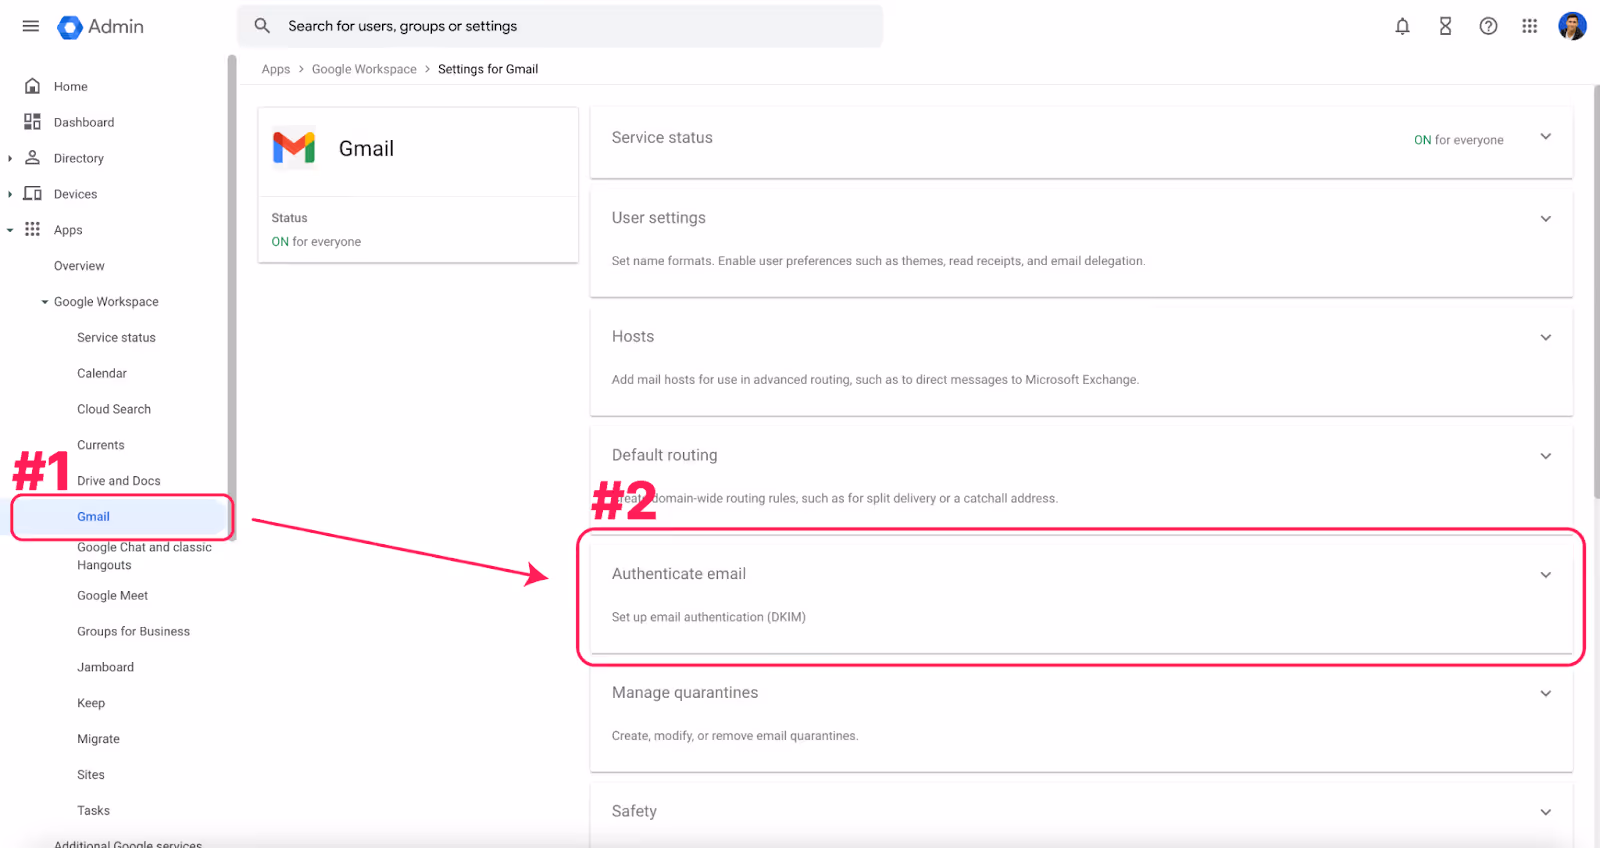
Step #1) Go to “Authenticate Mail” in Google Workspace.
In order to generate your DKIM key with Google, you'll have to follow these steps:
Log in to Google Workspace > Apps > Google Workspace > Gmail > Authenticate Mail (Learn more here)
Step #2) Generate a DKIM Key
Next, make sure you select the correct domain. Once the correct domain is selected, go ahead and click "Generate New Record" (see below) and follow the steps.

Finally, you’ll see a gray square appear with your DKIM key and installation instructions.

Step #3) Add the DKIM key to your domain's DNS.
Now that you've generated a DKIM key, all that's left is to add the DKIM key to your domain and start the authentication process. Let's add the DKIM key to your domain's DNS. Again, if you don't know what a DNS is or you don't have access to it, reach out to your web administrator for help. They will know exactly what to do.
So open up your DNS and create a new record. This is what your DKIM record will look like:
- Record Type: TXT
- Host: google._domainkey (This will change depending on your ESP)
- Value: v=DKIM1; k=rsa; p=MIGfMA0GCS…
Step #4) Start authentication.
Now that your DKIM key is added to your domain's DNS, all that's left is to begin authentication. Simply hop back into Google Workspace and click "Start Authentication".
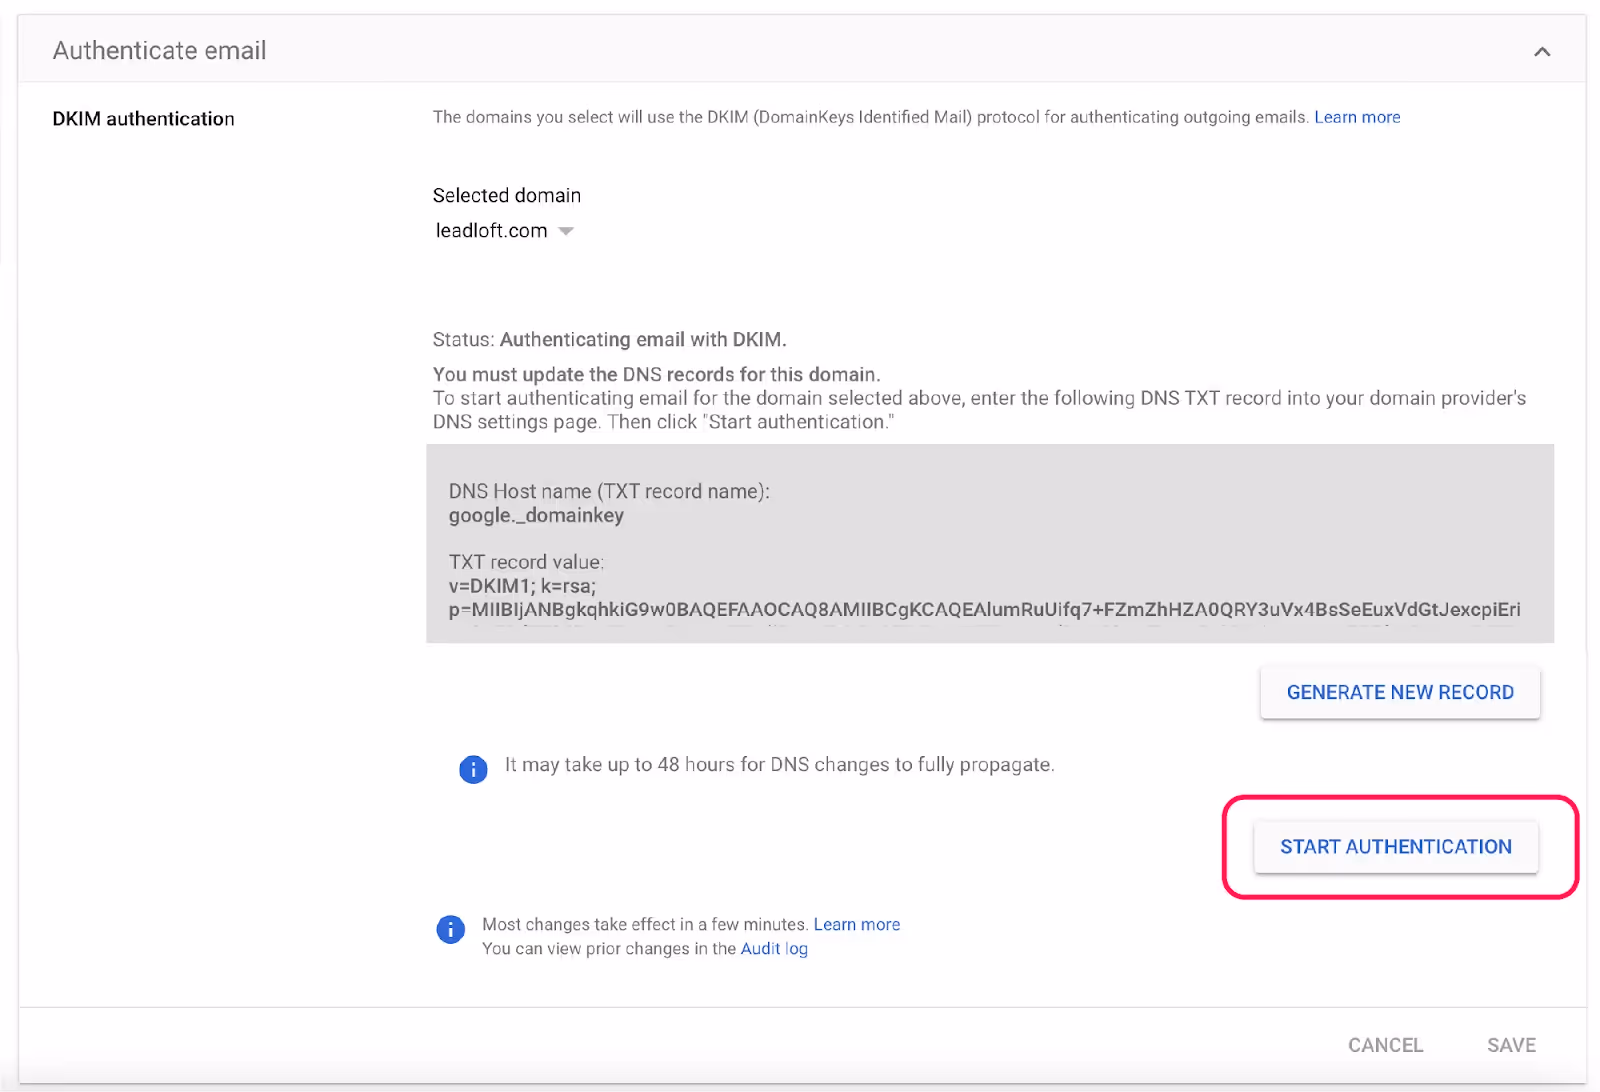
This can take anywhere from 3-20 minutes, so just be patient. If an error is returned, wait for 30 minutes and try again. And there you go, that's how to set up DKIM.
Wrapping Up
SPF and DKIM can seem daunting at first because it does require some technical knowledge. However, the benefits of setting DKIM and SPF up are massive, especially if your team uses email for sales. There's nothing worse than sending an email and landing in your recipient's spam folder.
So be sure to walk through the steps, and if you have any questions, feel free to reach out to our team. Even though this isn't something that is included in our service, we are always more than happy to help out where we can.