How to Use LinkedIn Sales Navigator for Lead Gen (2026 Tutorial)

.avif)
If you’re running a sales team and struggling to generate leads, LinkedIn Sales navigator might be your answer. You can use it to discover new leads, save contact info, and even track prospect activity for posts, job changes and more.
At its most basic level, it’s just a database but if you’re using it correctly, it’s one of the most powerful tools any salesperson can have.
In this article, we’ll be sharing how to get started with LinkedIn Sales Navigator and how to use it to drive new leads.
Let’s dive in!
What is LinkedIn Sales Navigator?
LinkedIn Sales Navigator is a sales product offered by LinkedIn that includes InMail messages and advanced features designed specifically for sales prospecting.
Feature included in LinkedIn Sales Navigator:
- More Search Filters
- List Building
- Job Change alerts
- Pinned Filters
- Boolean Search
- Warm Intros (TeamLink)
- Alerts
- Personas
- Buyer Intent
- Usage & Reporting
How much does LinkedIn Sales Navigator cost?
LinkedIn Sales navigator has three plans:
Core: $99.99 /user/month
Advanced: $169.99 /user/month
Advanced Plus: $1,600 /user/year (Billed Annually)
Which plan is right for you?
The vast majority of teams can get away with using Core forever. Most of the features included in Advanced and Enterprise are not useful to small teams.
However, if you have 30+ or more employees, Advanced is likely the best plan for you. Advanced includes TeamLink and list Retargeting which are super useful when you have more employees and a marketing department.
TeamLink allows your sales team to request warm intros from other employees in your company and retargeting allows your marketing team to retarget sales navigator lists from their LinkedIn Ads dashboard.
The only time Advanced Plus makes sense is if you are a large enterprise in need of SSO.
Where can you Sign Up for LinkedIn Sales Navigator?
You can sign up for LinkedIn sales navigator here and trial it for 7 days.
How to Use Sales Navigator for Lead Generation
Once you’ve signed up for Sales Navigator, you’re going to want to set up your account and get it ready for lead generation. This can change depending on your target audience but we’re going to walk you through tactics and strategies that apply to almost every sales funnel.
Let’s dive in!
1) Pin Filters
The default pinned filters in Sales Navigator are not all that useful. Many of them require Advanced or Advanced Plus subscriptions so let’s update them to be more useful.
You can click here to edit your filters:
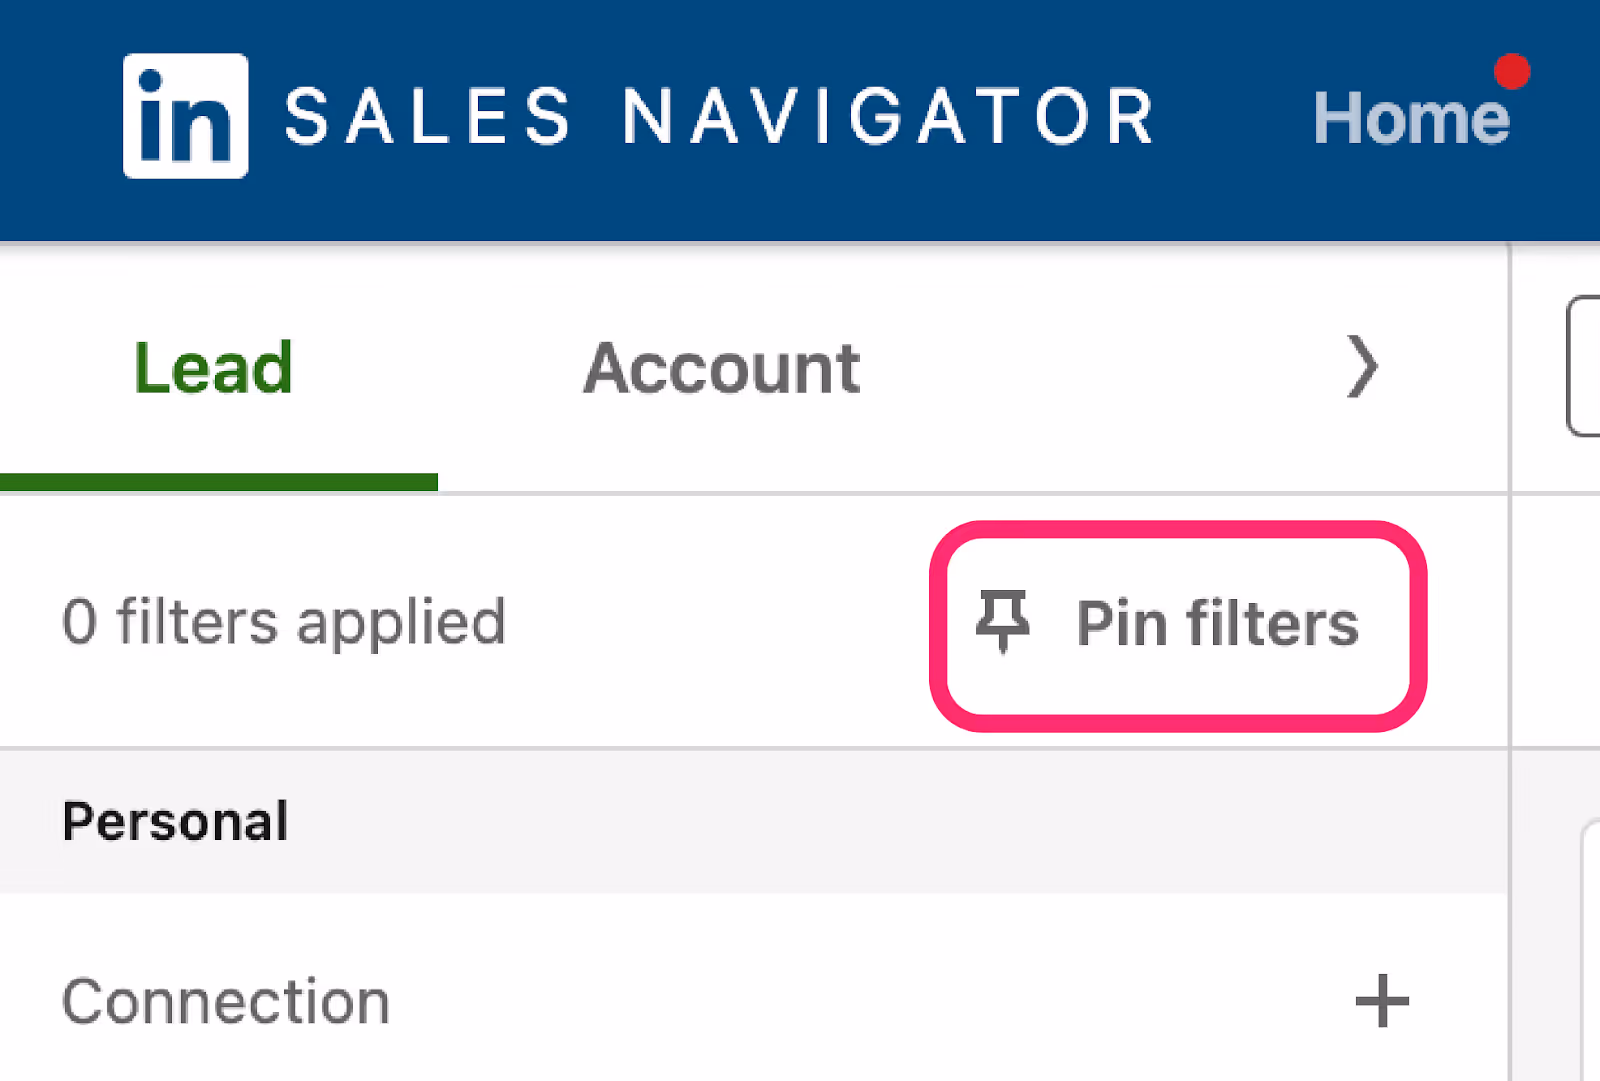
Now that we’re editing the pinned filters, let’s select the most important filters by clicking the pin icon next to them.
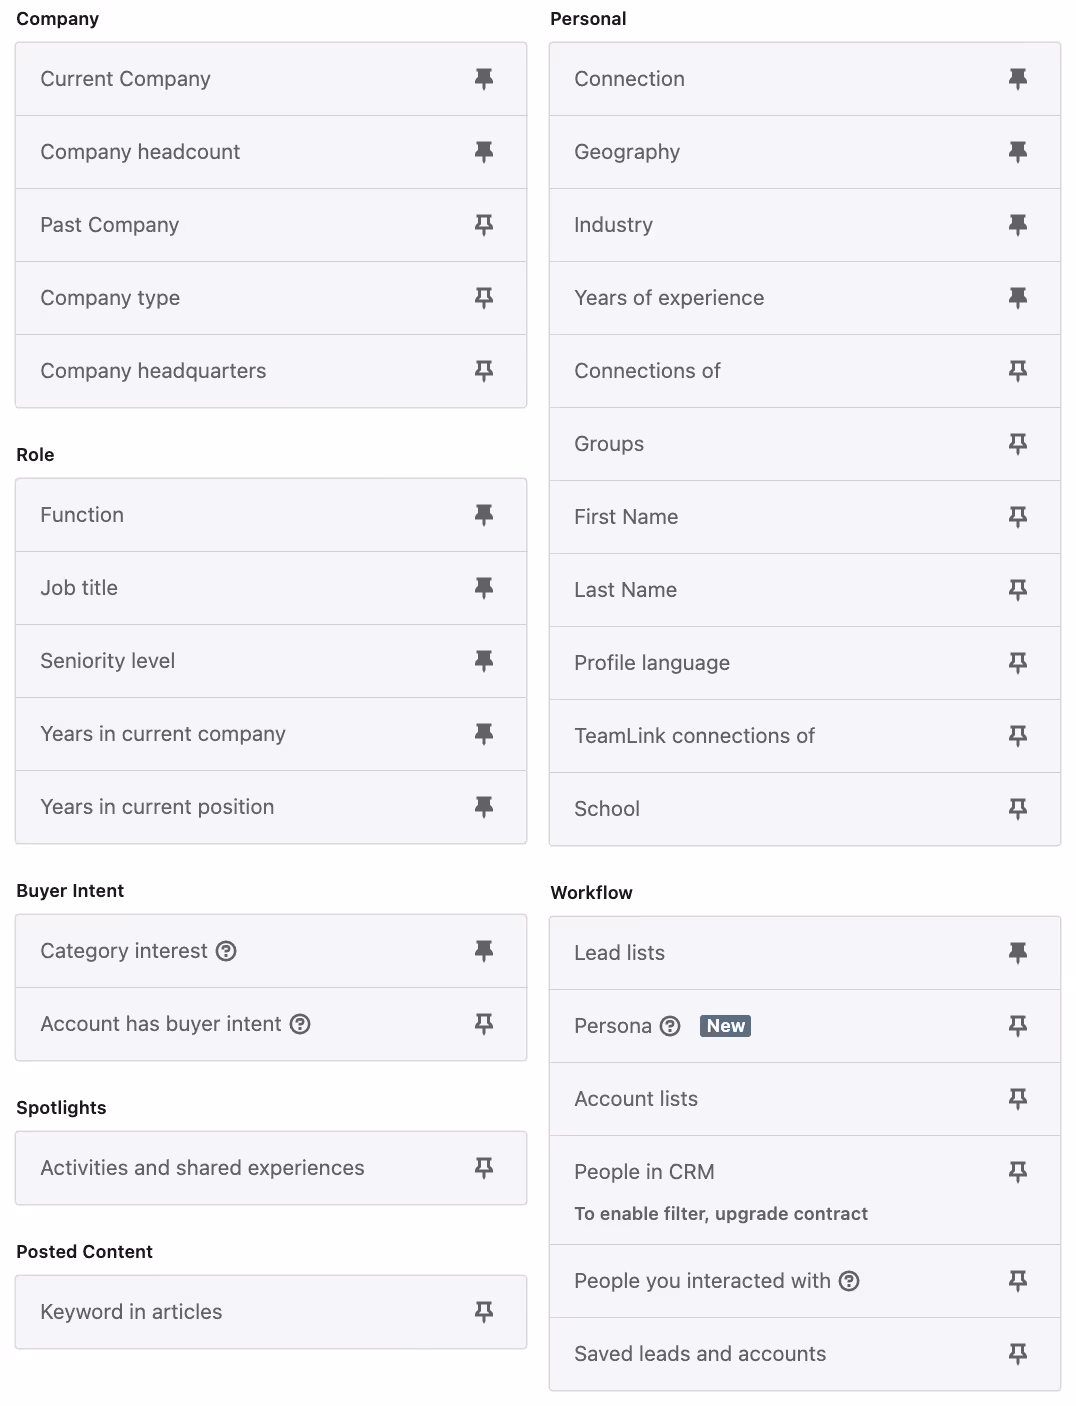
Which lead filters do we recommend pinning for Lead Filters?
Company Filters
- Current Company
- Company Headcount
Role Filters
- Job Title
- Years in Current Company
- Years in Current Position
- Function
- Seniority
Buyer Intent
- Category Interest
Personal Filters
- Connection
- Geography
- Industry
- Years of Experience
Workflow Filters
- Lead Lists
- Persona
- Account Lists
Here’s a screenshot of our set up:
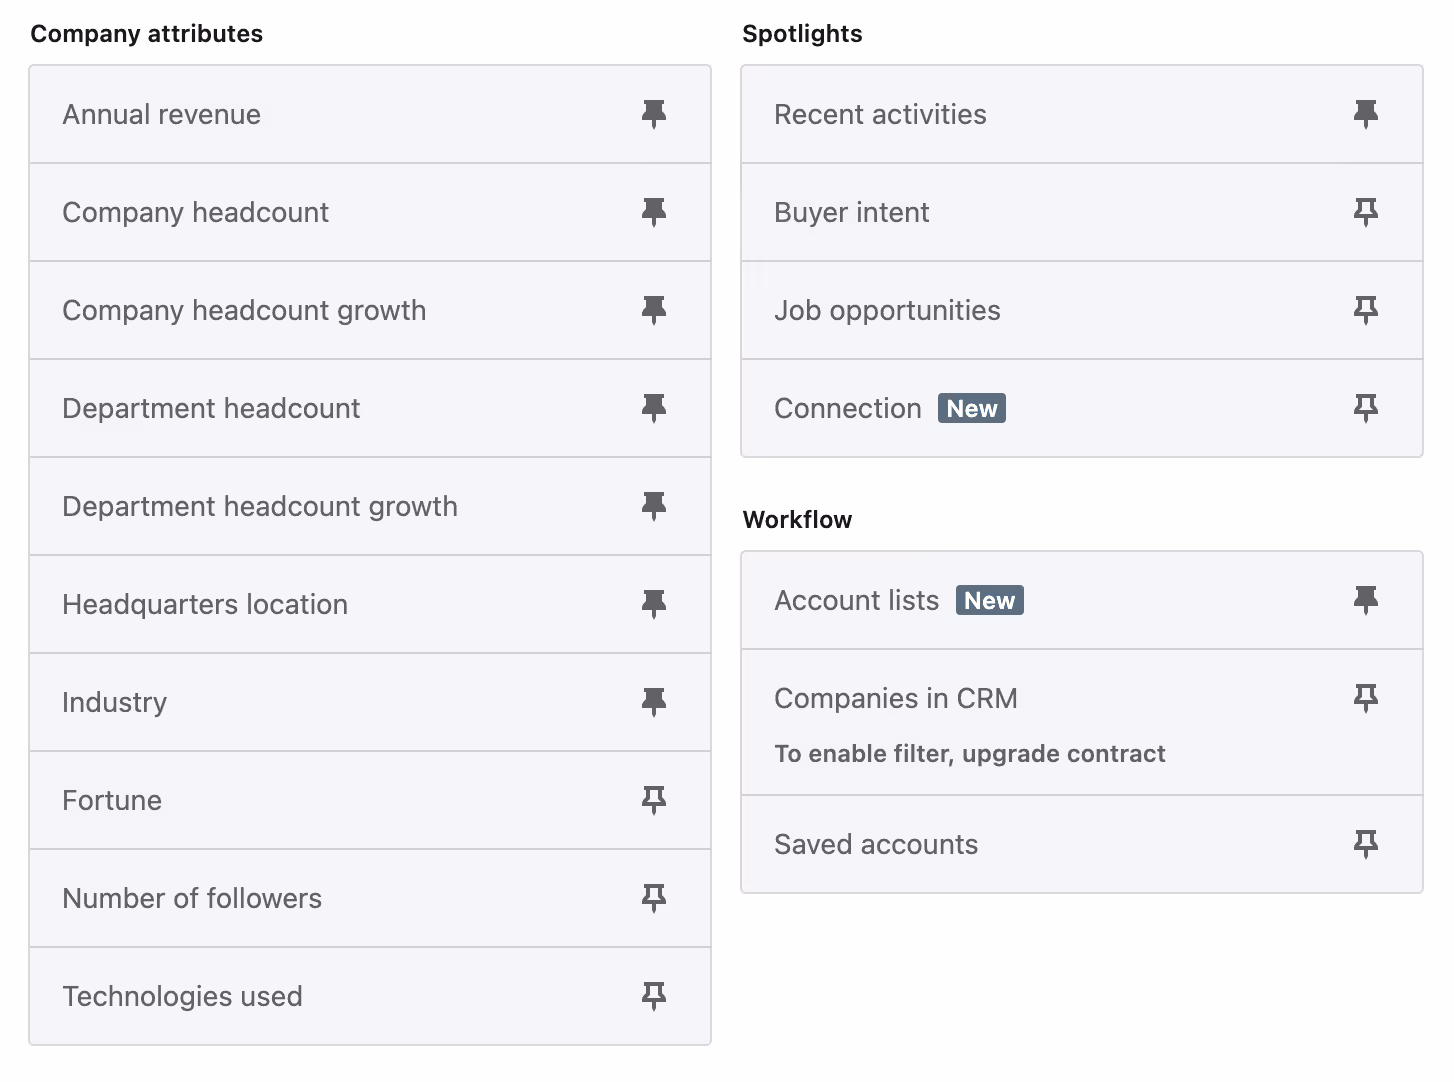
Which lead filters do we recommend pinning for Account Filters?
Company Filters
- Annual Revenue
- Company Headcount
- Company Headcount Growth
- Department Headcount
- Department Headcount Growth
- Headquarter Location
- Industry
Spotlight Filters
- Recent Activities
Workflow Filters
- Account Lists
Here’s a screenshot of our set up:
Once you’ve selected these filters, you can simply click “Done Pinning” and they will all appear on the left side of the screen for easy access. This will save you a ton of time when you’re prospecting so it’s best to set this up upfront.
2) Use Advanced Search Filters
By now you probably already have a good understanding of many of the filters within LinkedIn Sales Navigator but you should still spend some time exploring the additional filters offered.
We recommend applying filters and seeing how they work so you can learn how to narrow down your target audience to be more precise.
If you’re curious what some of my favorite filters are, here’s a quick list:
Lead Filters
- Company Headcount
- Seniority Level
- Category Interest
- Activities & Shared Experiences (Past Colleagues, Job Changes, News, etc.)
- Geography
Account Filters
- Headquarters Location
- Annual Revenue
- Company Headcount
- Company Headcount Growth
- Department Headcount
- Department Headcount Growth
- Recent Activities
I find these filters to provide the most value and tend to be the most reliable.
3) Use Exclusion Filters
Sales Navigator has a special feature that allows you to exclude certain filters.
A great example would be if you sell to tech companies and want to avoid contacting marketing agencies or consultants. In this case, you can use the “Function” filter, search for “Consulting” and click “Exclude” next to it.
Here’s what it will look like:
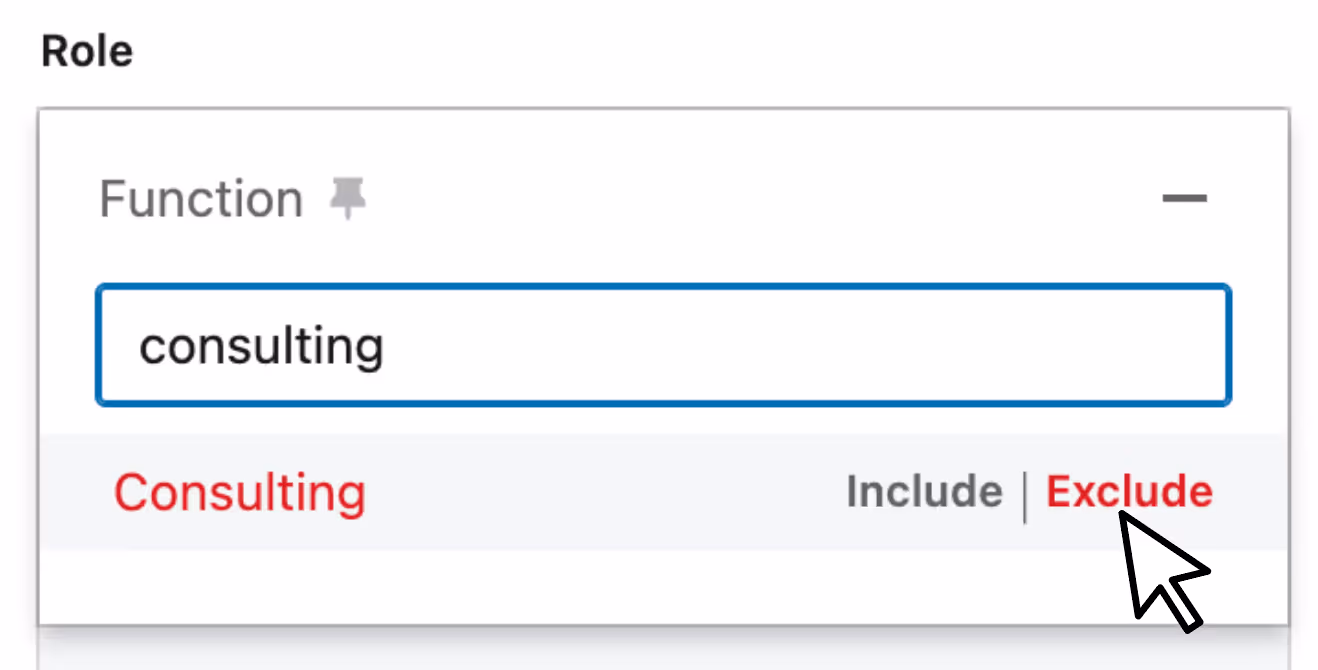
We love using exclusion filters to narrow the search when the prospects don’t seem super qualified. By applying a few exclusion filters, you can root out all the consultants, advisors, or anyone else who may not be a great fit for purchasing your product.
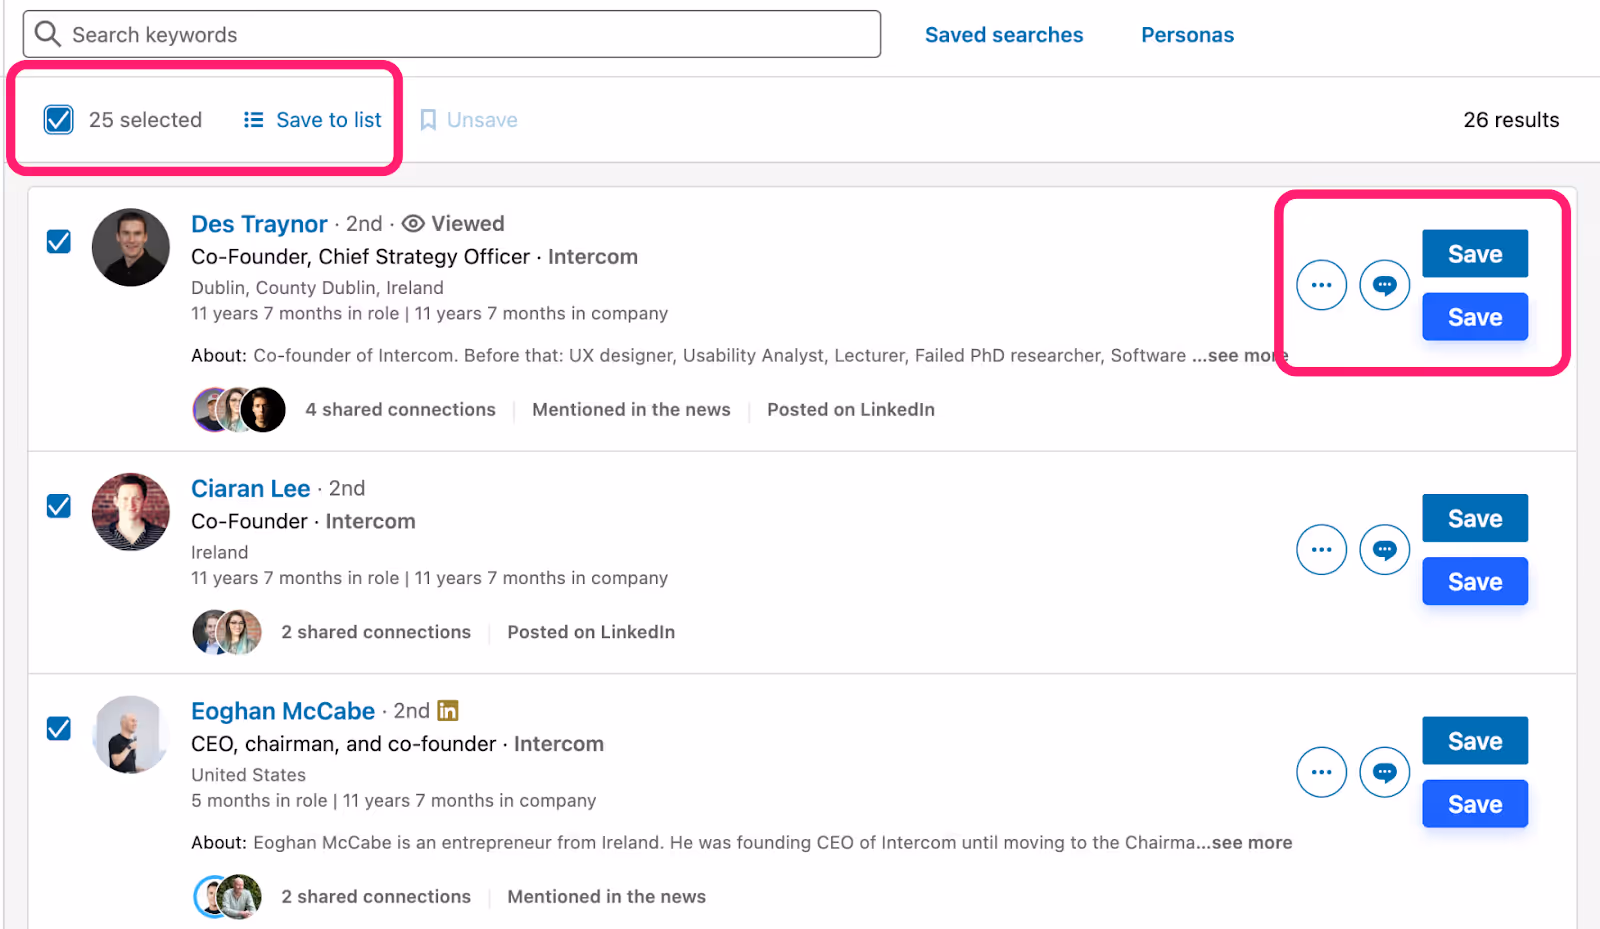
4) Create Lists
Creating lists is a great way to keep an eye on a list of prospects.
Instead of constantly searching for prospects, you can save leads to a list and observe it for job changes and other alerts.
How to save leads to a list?
- Select Leads & Click “Save to List”
- Click “Save” and select a list.
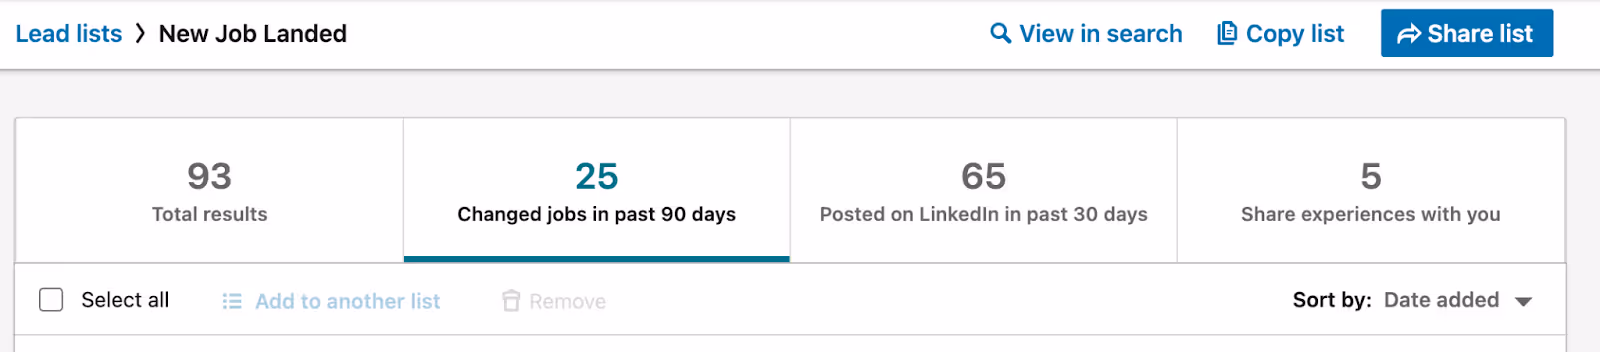
Once you’ve created these lists and added prospects to them, you can view the list at any time by clicking “Leads” or “Accounts” at the top of the Sales Navigator Dashboard as shown below.

From there you can select your list to view all the leads or accounts inside of it. LinkedIn will let you know if anyone has changed jobs, posted, or has shared experiences with you. You can filter for these activities by simply clicking the column you wish to view.
Here’s what that looks like:
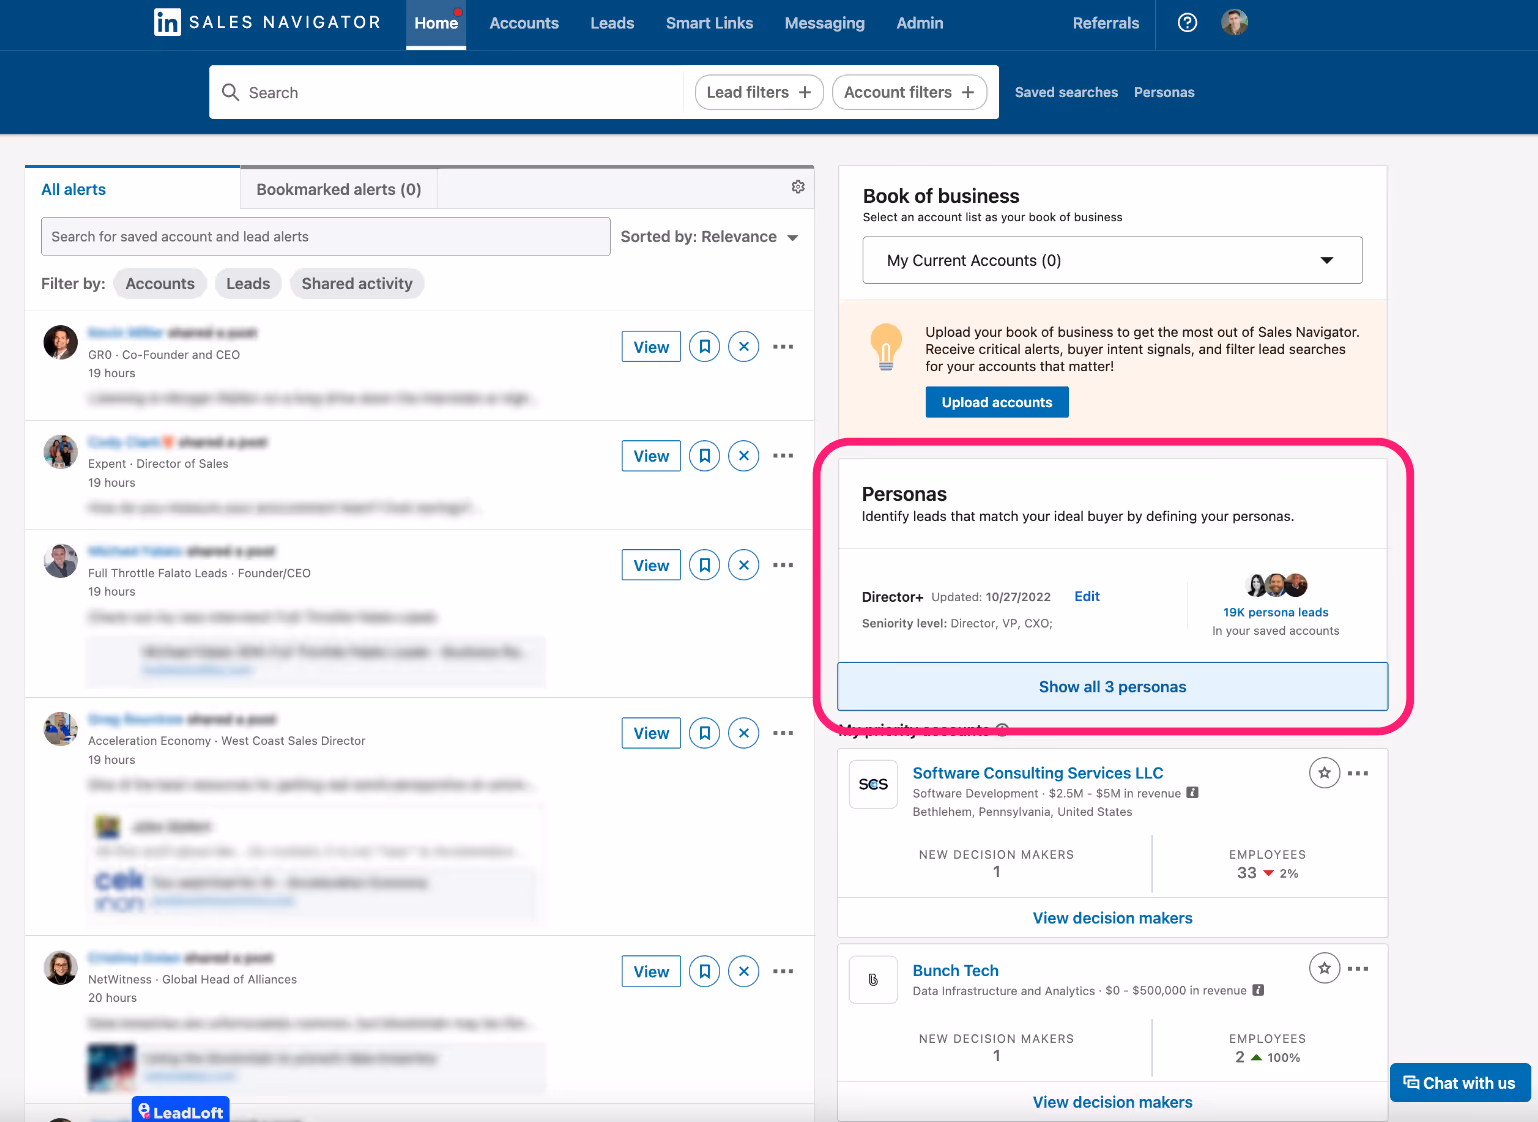
5) Use Custom Personas
You may have already noticed that you are able to filter for different personas but what are they?
In LinkedIn Sales Navigator, Personas are supposed to define your ideal buyer. This is done by applying filters and each set of saved filters is called a Persona.
You can customize your personas by navigating to the Sales Navigator home page and click “Show All Personas”.
See here:
Once you’re in, you can edit your current personas or create new ones by using the button at the bottom.
Shown here:
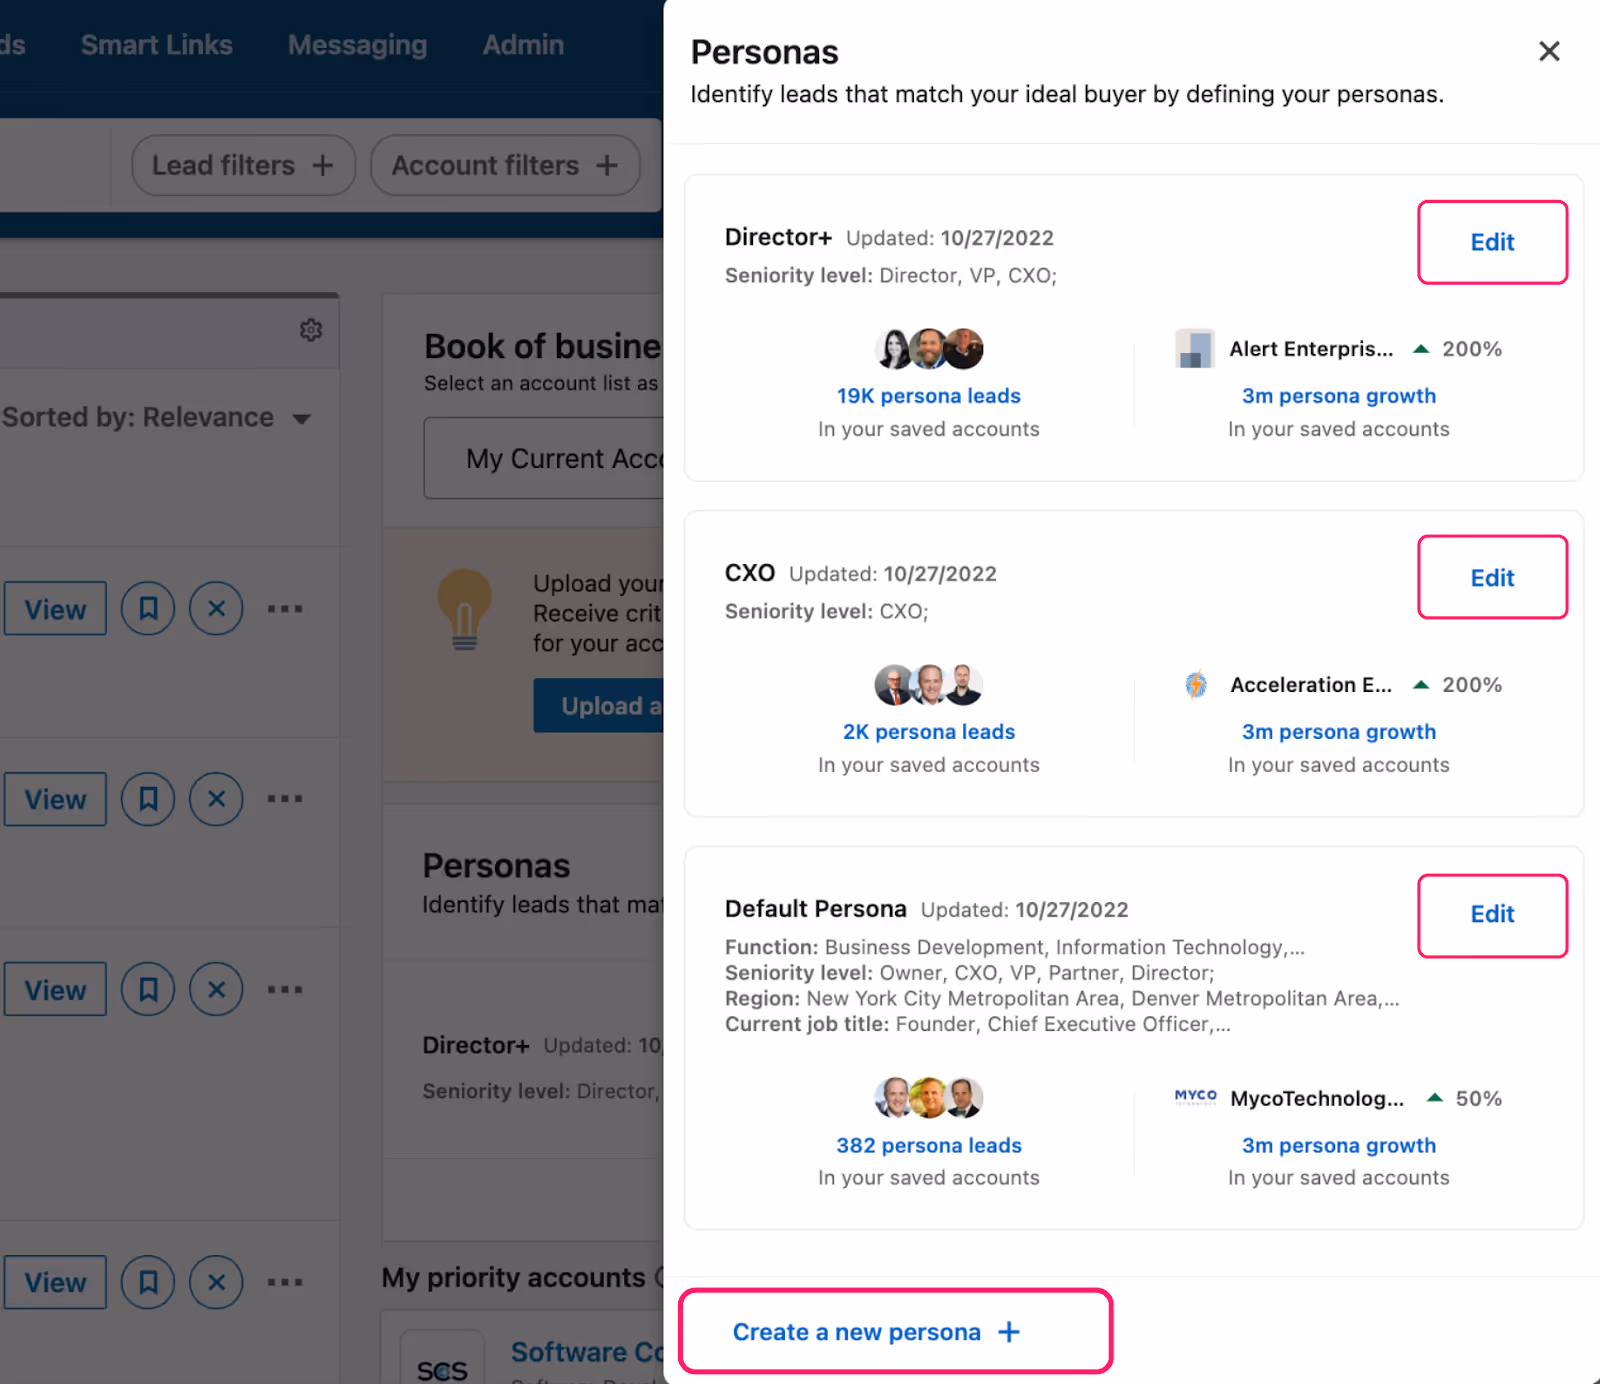
Once you’re here, you’ll want to make sure you build personas that match your ideal customer profile. If you don’t already have an ideal customer profile, we recommend testing multiple audiences until you find one that clicks. If you need additional help, check out our guide to mapping an ideal customer profile here.
6) Use Alerts
Most Sales Navigator users don’t use Alerts correctly because most aren’t aware that you can customize them or even how to use them.
What are Alerts in Sales navigator?
Alerts in Sales Navigator notification of activities performed by your target prospects. This can come in the form of LinkedIn posts, job posts, job changes, and much more.
This is what alerts will look like:

Where do you access alerts?
Alerts can be accessed from the Home Page in Sales Navigator.
Navigate here:

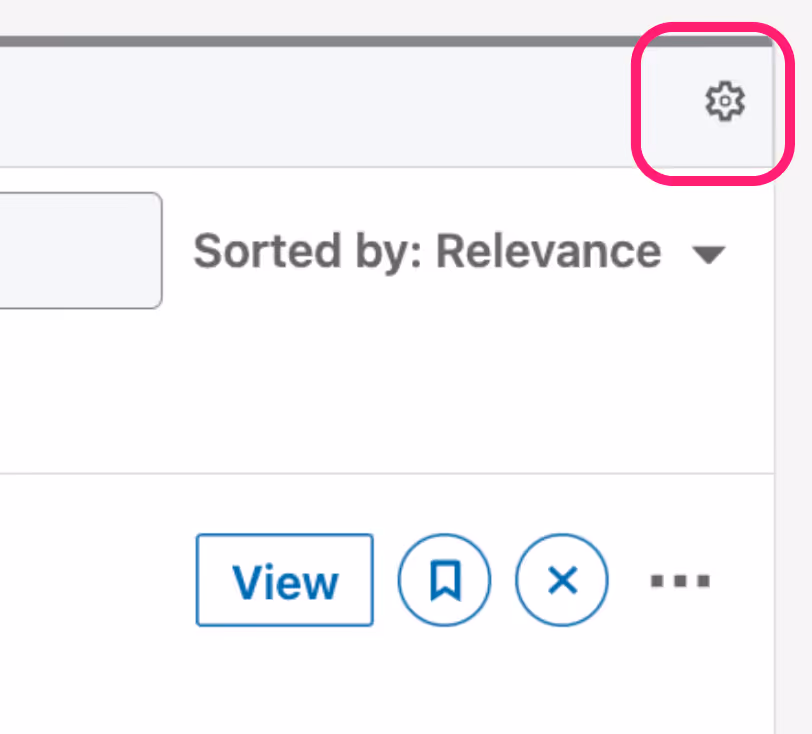
How do you customize Alerts?
You can custom alerts by clicking on the gear or settings icon on the top right of the alerts card.
Here’s what the alert settings button looks like:
It will take you to the alerts settings that have tons of different options. If you don’t feel like going through every single setting, we’re going to share our recommendations below.
Turn Off Alerts from Lead/Company Posts
Most of the alerts are useful but some can be overwhelming. Most companies have a social media team posting updates so we recommend turning these alerts off. The alert name is “An account shared an update”

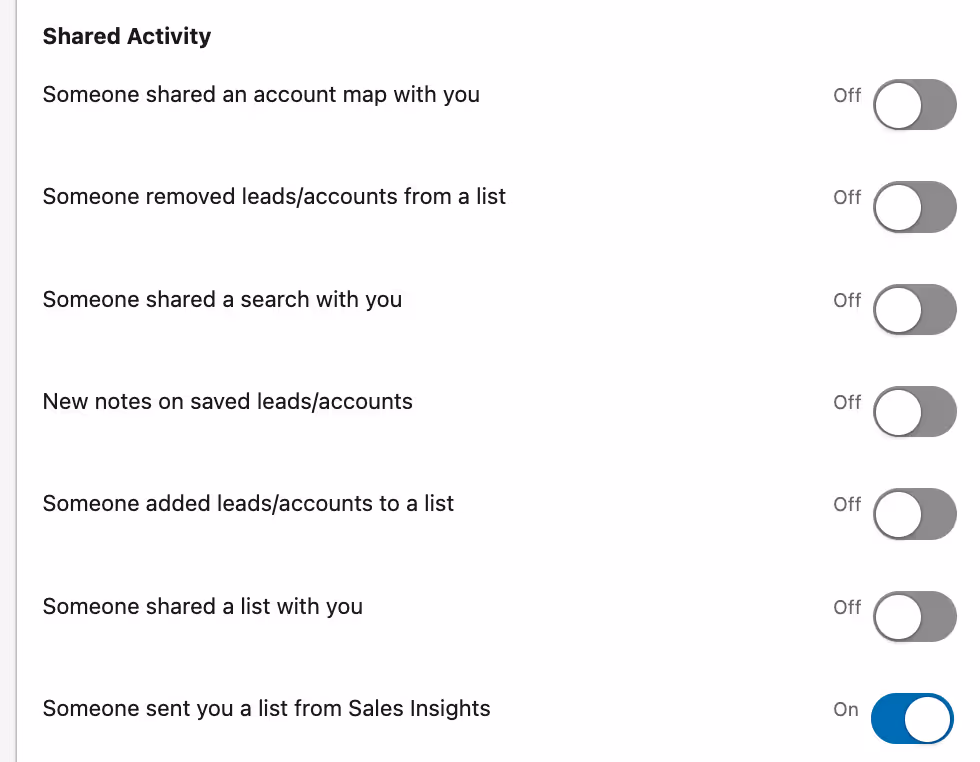
Turn Off Alerts from Team Members
If you have a larger team, the alerts from your team can get overwhelming quickly. We generally recommend turning the team notifications all off if your team are aggressive users.
Here’s are my settings for Shared Activity:
7) Send Connection Requests
This tip goes without saying but you should always try to connect with your leads. Some team’s prefer to connect before meeting while others prefer connecting after making a connection. Regardless, just make sure to incorporate LinkedIn connections into your workflow.
If you’re curious about when you should connect, most outbound teams will try to connect as soon as possible while inbound teams connect after meeting. This is because the connection rates are 2-3x higher if you’ve already spoken with the prospect.
8) Send InMail Messages
LinkedIn Sales navigator comes with the unique feature of InMails, which are basically sponsored LinkedIn messages. They are free to send to some accounts while others are blocked off.
It’s generally best to send real LinkedIn messages if you can and only resorting to InMails as a last resort. However, InMails can still have a high response rate so you should always incorporate them into your outbound outreach and follow ups, especially if you are unable to connect.
9) Find Emails & Phone Numbers
LinkedIn is a great platform and the vast majority of white collar workers use it and rely on it when applying to jobs. However, not everyone is on it day to day. This means that it can actually be impossible to connect with some prospects on LinkedIn.
If you’d like to ensure you get in front of someone, taking the conversation to their email or phone is a necessity. In this case, you need to make sure you are searching and saving your prospects phone numbers.
You can find anyone’s contact information by using a chrome extension like the LeadLoft Prospector.
When you click “Save” on someone’s profile, LeadLoft will create a lead for them within your LeadLoft dashboard and search its own database to find the prospects email and phone number.
Wrapping Up
LinkedIn is a powerful database but if you want to make full use of it, you’re going to need to sign up for LinkedIn Sales Navigator. The extensive filters and the up to date business data is unmatched by any other prospecting tool online.
Just be sure to stay on top of your leads, personalize your outreach, and find their contact information so you can engage them across multiple channels.